Building The Anasazi Oven
Overview
I have built The Anasazi Oven and I can testify that it does work. I made a few minor modifications from my plans. Most importantly, I used mud to fill in the gaps between bricks and concrete (my concrete slab was anything but perfectly flat), I used a 4ʺ×4ʺ×16ʺ long concrete “brick” over the arch (again because of the poor fit of the roof), and I wrap a layer of aluminum foil around the outside of the oven for improved heat retention.
In addition, I did away with the bottom concrete slab and sand, and just put the bricks directly on my concrete patio.
The Materials
Here is what you’ll need:
- 2 straight 2ʺ×4ʺs
- A 36ʺ square sheet of plastic (if you have a nice flat surface to pour concrete onto), plywood, or the like. Cardboard doesn’t work well.
- 2 bags of concrete mix, one for each slab.
- 1 bag of sand is more than enough for under the hearth.
- 59 solid modular clay brick; also known as red pavers. Don’t get concrete pavers. You might want a few extras in case you break some.
- A few 8-penny nails
- Some mud, preferably rich in clay.
- 1 box of wide heavy-duty aluminum foil
All of this can be found at Home Depot, except maybe the brick depending on where you live. There’s usually a brick yard nearby in any case. The materials cost me less than $60.
The Tools
You will need:
- Shovel and wheelbarrow for mixing concrete.
- Brick set (a big chisel for cutting brick)
- Hammer
- Saw
Concrete
You don’t need perfect or even good-looking concrete slabs, but it will be much better if they have a nice flat bottom. This is simple to acheive, but I messed it up. I balked at the price of plywood, so I gave cardboard boxes a try. They warped which leaves lots of gaps between the walls and the roof, which I have to fill with mud. Much better to either invest in plywood, or do what I would do now: lay a sheet of plastic down on a flat surface (like my concrete patio) and pour the concrete on that.
If you are willing to pour the slabs one at a time, you can use the same 4 2ʺ×4ʺ pieces to pour both slabs. If time is of the essence, you can pour both slabs on the same day with two forms. Cut two 2ʹ4ʺ pieces and nail the 2ʺ×4ʺs together into a nice rectangular box.
Pouring concrete is pretty straightforward. Mix according to the directions and shovel/pour it into the form. spread it with a piece of 2ʺ×4ʺ or a trowel and/or your hands, and try to get it as smooth as you can on the top. If smooth isn’t working, go for decorative.
Let the concrete cure for a week. Wet it down every day, and cover it with a tarp if that’s feasible.
Cutting Brick
You can cut brick amazingly well with a tool called a brick set. The key to using this tool is to score the brick really well. I mean a tangible groove all the way around the brick where you want to cut it. You can do this by tapping the set, sometimes at an angle, until you have a nice deep score. Once it’s well-scored, give the set a few precise and powerful hits with the hammer until the brick breaks. It helps to do this in dirt or sand or something where you’re not going to break the brick on a pressure point (uneven concrete, a pebble, etc).
The Foundation
If your concrete slabs are like mine, the tops are very uneven, but hopefully the bottoms are nice and flat. I’d turn the bottom one over, so that the uneven part is on the ground and the flat part is ready for the hearth. This is good for two reasons: your hearth has a nice flat surface so you don’t need much (if any) sand to lay it on, and because the air pockets underneath will act as insulation.
Lay the hearth bricks as evenly as possible, but don’t fret it too much. I ended up laying mine directly on the concrete patio, which is good enough for me.
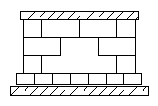
The Oven
This is the easy part. It’s just like being 3 years old again. Just stack the bricks. You’re going to want to plug up all the cracks so smoke, steam, and hot air can’t escape. You can use mud judiciously here as a sort of mortar, or you can plug the holes with mud later.
The only hard part is the arch. Unless you have a 4ʺ×4ʺ×16ʺ block like I do for the “keystone”, you will want to wait until you have the roof on to place the top middle bricks.
The Roof
Have someone help you set the roof on the oven. If the bottom of the roof slab is very flat, you should have a nice fit. If not, you might like to lay a layer of mud mortar first.
Once the roof is on, slide the two “keystone” bricks into place. Hopefully the fit is fairly snug. If you have to lift the lid slightly to get them in, pat yourself on the back. If they sag like a wet diaper, you might consider alternatives. The 4ʺ×4ʺ×16ʺ concrete block I keep blabbing on about was only $2. You can get an angle iron to hold the bricks up for about $15. You could pour your own keystone at the same time as you pour the slabs. Don’t worry about color here—it will be covered with soot in short order and it just won’t matter.
The Door
Build a door with the leftover 2ʺ×4ʺ scraps. Cut three 2ʺ×4ʺs to cover the opening, and nail on some cross beams. When baking bread, you’ll lay a wet dish towel across the door and cover the opening. The wet towel will keep the door from charring, and contribute steam to the oven. You won’t use the door for cooking pizza.
Insulation
Although you can use the oven without any insulation, and you may even be able to make pizza and bake a loaf of bread, adding a little insulation in the form of foil will make an amazing difference and is very cheap and easy. Just take the foil and wrap the oven in it. You can use rocks, bricks, etc. to hold it in place, and you can use duct tape as needed to connect the pieces. I don’t bother wrapping the front, just the sides/top/back. I only needed three sheets of the wide stuff.
It really is amazing how this works. You can hold your hand arbitrarily close to the very hot oven and not even feel the heat, but if you were to touch the oven through the foil you’d see the outside of the oven is very hot.
Without the foil, the hottest I’ve seen the outside get is 400°F. With the foil, it gets hotter than my infrared thermometer can read. Without the foil, my oven dropped to 425°F after 45 minutes, and 350°F after an hour. This is barely enough to manage a loaf of bread. With the foil, it was still 475°F after 45 minutes, and 375°F after an hour and a half.
If you wanted to try sticking faceless fiberglass insulation between the foil and the oven, that might help even more. Or it might catch on fire or poison your dog. You’re on your own if you go down that road.
Curing the Oven
Even with a dry stack oven, it’s a good idea to cure the oven. This process dries out the bricks, concrete, etc. gently. There’s great instructions for curing an oven at Forno Bravo. Even more importantly, the curing process will educate you about how fire burns in your oven. I’ve found that fire management in such a small oven is quite tricky.
Using the Oven
Now, finally, you’re ready to cook in your oven. The hard part is firing the oven, because the small space can make it hard to keep a fire going at first. Don’t forget to read the page on firing your oven. You’ll need a few more gadgets to properly use your oven:
- An axe for chopping wood.
- Wood, newspaper, matches.
- Welding gloves, or superhuman heat tolerance.
- A pad to lie/sit on, unless you went all-out and raised your oven with cinder block or something.
- A flashlight comes in handy when preparing the fire.
- Something in which to store hot coals and ashes in (a metal bucket or maybe a nearby BBQ grill).
- Something with which to scoop hot coals and ashes—i.e. a metal shovel, preferably one intended for the task (flat bottom).
- Something to scrape the coals out with—I found a kids rake for $8 that does this well. Throw a damp rag on the end and it makes a good swabber too.
- Oven thermometer, unless you’re just doing pizza.