Brick Ovens for the Cheapskate
Update (August 2007)
I have built The Anasazi Oven and it does indeed work. However, you’ll definitely want to read about my building experience so you don’t have to learn the things I learned the hard way.
The Story
When it comes to nonessentials, I’m a cheapskate. I’m somewhat famous for it in some circles. I’m also a bread enthusiast. Naturally, I’d love to have a brick oven in my back yard, but there are two obstacles to overcome:
- I’m a cheapskate.
- I’m not a homeowner.
- I’m a cheapskate.
I went to the library and checked out, then devoured, The Bread Builders: Hearth Loaves and Masonry Ovens by Dan Wing and Alan Scott, which I highly recommend. I learned a lot about brick ovens, and a lot about bread that I have been able to use even without a brick oven. But the ovens they show you how to build in that book are serious ovens, definitely not for cheapskates. Also definitely not for renters.
So I picked up Build Your Own Earth Oven by Kiko Denzer. (Again at the library. I’m a cheapskate, remember?) This book is all about building ovens out of cob, aka mud or adobe. But no bricks. It’s very inexpensive and very hippie. I learned a lot about how to make a cheap oven from this book. But in the end another of my virtues talked me out of it: I’m lazy. Cob is not hard, but you have to find out if your soil has enough clay but not too much and do all kinds of other things that involve driving or walking around and doing hippie things.
Then it occurred to me that maybe I could design a simple brick oven that cheapskates and renters alike could build and enjoy. I fired up QCad, stared at a blank screen for a bit, and then drew up the criteria based on the knowledge I had gleaned from these books: the essential “good qualities” that were discussed in Bread Builders would be adhered to (at least the ones that are orthogonal to cost), it had to be cheap and easy to build, and pizza and bread had to fit through the door.
The most important qualities were that the oven be a little bit longer than it is wide and that the door be about 63% the height of the oven. Thick walls, cladding, insulation, fancy stands, digging down past the frost line, chimneys, etc. were all eschewed in the name of simplicity and cheapskateness. I need an oven that can cook 2 loaves of bread at a time and/or a pizza or two. I don’t need to then cook 3 chickens and a casserole. I realize this is somewhat inefficient in fuel, but on the other hand it takes much less fuel to heat up my ovens (theoretically). Besides, others have built similar ovens. In fact the authors of both books have built ovens of similar thickness which worked great.
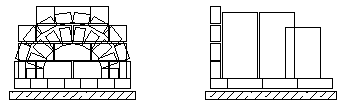
I have some experience with laying brick. Actually, cinder block, but we can pretend. I haven’t layed an arch before, but I think it would be a fun and interesting new thing to do, so I designed an oven with an arch. This oven, which I have named Le Bâtard, is just 3 arches, a back wall, and a floor. If you have some masonry experience or would like to get some, I think this would be an excellent choice.
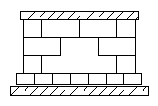
Then I realized that not every cheapskate would be a mason, so I designed another oven which I call The Anasazi Oven. It actually has nothing to do with the Anasazi, other than it’s door is like an upside down Anasazi door. (Inspired by Vestal Design’s Brick Oven 2.0) I know this because I went to the Gila Cliff Dwellings last weekend and saw such a door) that seemingly exists for the sole purpose of confusing archaeologists. I can’t be held responsible if your Anasazi ancestor gets mad and won’t speak to you after you build this oven. The Anasazi Oven is based on a simple concept: everybody knows how to stack building blocks. You also have to pour some concrete, unless you get creative with the foundation and roof. It is a simple oven, and the best for the timid DIY adventurer. Theoretically (my theories, to be exact) it might cook slightly suboptimally compared to Le Bâtard, if for no other reason than because arches are awesome.
Both ovens are comparable in price and weight. I did some careful estimating, and I think both ovens should run you between $60 and $70, assuming you have to buy all the materials. Both weigh about 500-600 pounds, about as much as a small upright piano. In that sense both are portable; you and a few buddies could heave it into a truck. That’s good news for renters: if your landlord doesn’t like it you can get rid of it. (Sell it, you can probably get a good ROI if you can find the right local venue.) However The Anasazi Oven is quite a bit more portable than Le Bâtard, because The Anasazi Oven has no mortar. The concrete slabs weigh in at about 100–150 pounds each, and each brick is a mere 4.6 pounds. Two buddies (with you supervising) should be able to manage disassembling and/or moving this oven.
Building Notes
I don’t want to give you a play-by-play, but I’ll try to at least give you the vocabulary and concepts you need to learn how to do the things you need to do to build the oven you need to build.
First, the concrete. Make a form on a flat level surface with a sheet of plywood and some 2ʺ×4ʺs. You might find a few nails and a hammer handy too. Pour the concrete into the form and level off with a 2ʺ×4ʺ. Pat it with the 2ʺ×4ʺ to bring a smooth surface. If you’re not experienced with concrete, it’ll probably be really ugly. Don’t fret it. Make hand and paw impressions and inscribe your name, the date, and your SSN. Let them sit for a couple of days. There’s lots of information on working with concrete if this paragraph hasn’t taught you all you want to know.
There’s also lots of information on laying brick. I refer you to the experts.
There’s lots of information on cob out there, too. I didn’t even know what cob was 2 weeks ago, so I’m not the best person to ask. Visit your library.
Bricks come in different types and sizes. You want a clay modular brick. “Red Brick” is a common variety, but make sure it’s actual “Red Brick” and not just a concrete brick that’s red. Hint: I couldn’t find real bricks at Home Depot or Lowe’s or Wal-Mart. Your mileage may vary if brick is in style where you live. I had to go to a masonry supply store. A modular brick is 3⅝ʺ×7⅝ʺ×2¼ʺ, give or take a smidgeon. If you can get firebrick and your inner cheapskate will let you, it can only be an improvement. I think red brick is fine though. Plus it’s red, like a sports car.
Likewise concrete comes in different types. Normal concrete will weaken by as much as half at the temperatures we’re talking about. That might concern you, but it doesn’t concern my inner cheapskate. We’re not holding up your Aunt’s wig collection, it just has to hold itself up. If you want to spring for refractory concrete, be my guest.
You never would have guessed, but they make mortar for high-heat situations too. See the previous paragraph for my thoughts on this.
The floor has no mortar. This makes for a smoother surface, and allows you to replace bricks that chip or crack (something that apparently happens with oven floors from time to time). Spread about a half inch of sand on the foundation and make it very smooth. Use fine sand for best results. Now place the centermost brick. Now gently align the next brick and slide it down into place. Hit things (gently) with a hammer so that the tops match up. The Bread Builders has more detailed instructions on this.
You’ll need to cut a few bricks for these designs. I’ve never done this but Dr. Google tells me that it is just a matter of hitting an inexpensive tool with a hammer.
To make a frame for an arch, lay the bricks on a piece of plywood in the shape of the arch and draw the outline of your frame with a pencil. Then cut two pieces and nail some 2ʺ×4ʺs between them. Leave a gap at the bottom which you will shim up. That way you can get the frame out by removing the shims. Getting the frame out is considered a Good Thing™.
The gap between the second and third arches of Le Bâtard is a little large for mortar. You could use mortar, but it might be better and cheaper to use a little concrete (if you have some mix left) or mix some gravel with your mortar. Or, just use some cob. Whatever you do don’t leave the gap open, you’ll let heat and steam out.
You’ll need a door. The simplest door is some wood (those 2ʺ×4ʺs you have lying around perhaps) with some more wood nailed on as a handle, that you can slide into place, with a decent fit. Then drape a wet cloth over the inside of the door when baking. This will provide a better seal, contribute steam, and keep the wood from charring. You probably don’t want to use plywood because of the chemicals.
You don’t need a fancy base. The whole point of the foundation slab is to let you put this just about anywhere that you don’t mind killing the grass. But if you want to bring the oven up to a convenient height, a few cinder blocks seems like a convenient way to do that. But hey, the Japanese eat sitting on the floor, surely you can get by cooking on the floor.
Both ovens could benefit from some insulation. That would make them a little bit more serious. You could use perlite, vermiculite, or pumice as the concrete aggregate. You could put your oven on a base made of cinder block filled with one of those aggregates. Or you could find some creative way to surround the oven (or parts of it) with fiberglass insulation (the kind without paper). Or you could just heap some cob on and let the increased thermal mass do practically the same thing as insulation (at the cost of more fuel).
Speaking of heaping cob, a variation on Le Bâtard would be to not use mortar but instead just heap a couple of inches of cob over the arches (which are being held up by forms of course). Then if you have to move it you can break up the cob with your favorite sledge hammer, and re-cob it at the new destination.
Le Bâtard in action
Jon Alonzo sends a picture! 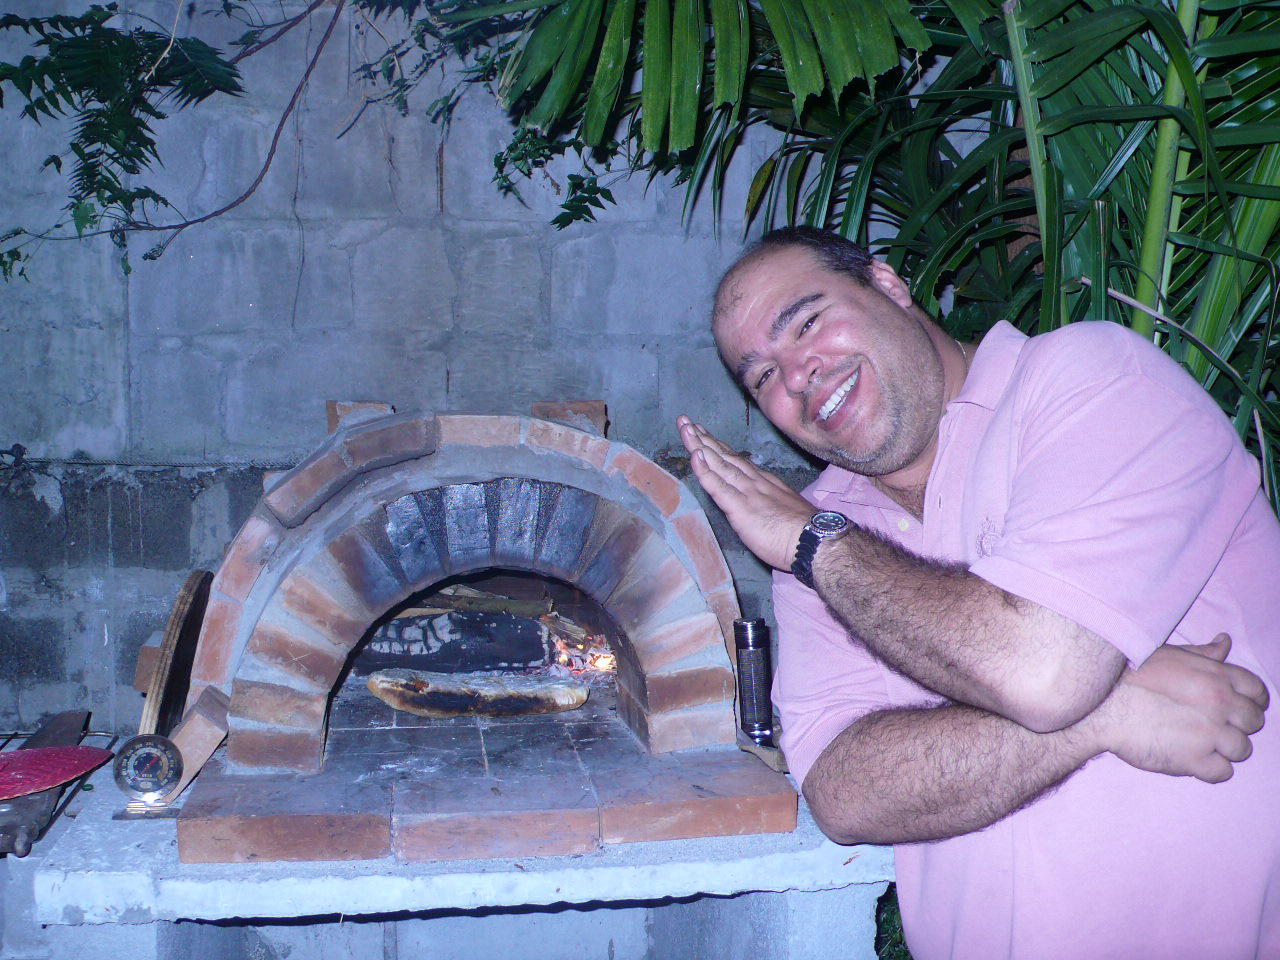
Cooking in Your Oven
I haven’t actually built and used these ovens, so this is the blind leading the blind.
Start a small but bright fire near the front of your oven, with fuel trailing off to the back of the oven. Burn for about an hour or so, then put out the fire and remove the ashes. (With what? Get creative. Don’t go out and buy one of those scraper things. That would be uncheapskatelike) Close the door and let the oven “soak” for awhile, i.e. let it even out its heat. If you were me you would get a $5 oven thermometer and get to know your oven.
For pizza you leave a small fire going in the back. You want a really hot oven for pizza.
Feedback
Please do let me know if you use these plans, or even if you just think you might like to some day. I hope that someone will find them useful. I hope I will find them useful, just as soon as I can save up $65…